Saturday, December 29, 2012
New Blog
Blogger says I've reached my limit of free posting. That was pretty much the nail in the coffin for this blog. I'd wrestled for a while with what to do with it, as the title is no longer relevant to my life. After much deliberation, I've decided to simply start a new blog. Fresh start. Feel free to come read over at The Oklahoma Texan.
Thursday, November 8, 2012
Hospitality and the New House
Before we moved, we had a wish list of things we wanted in a new house. Number one, of course, was no foundation problems! But a few other things were a laundry room (rather than a closet, like I had in Texas), a dining room big enough to hold our oversized table, and a large enough home to be able to host groups. I'd always been a bit troubled that we rarely had people over, including our youth group, in part because seating people at our table meant rearranging the dining room and the living room. It was such a major hassle.
We actually prayed for these things, and God gave us what we asked for. Now it's my turn to follow through.

Our table fits beautifully in our dining room. It can seat up to 10 people, and wouldn't you know, our small group at our new church has 10 people in it. We hosted the group last night, and the only furniture I had to move was chairs. Even better is that we have so much space in this new house that we can set up several card tables, as well, if needed. God has blessed us abundantly, and I'm thrilled to be able to actually open my home without it causing too much stress or physical labor.
We've let the youth minister know that our home is available if it's ever needed for Disciple Now or whatever. He mentioned a progressive dinner at Christmas, so I'll be sure to remind him that we're willing to host that if he needs homes. It's exciting to finally have a home we enjoy opening to others.
Sunday, September 23, 2012
First Birthday Party
Because we're in a new place and don't know very many people, I was determined to make Alex's first birthday something special. I planned a little party, and we only invited my parents, who had planned to come in from Texas, and the neighbors behind us, as we get together occasionally with the kids.
Unfortunately, only the neighbors were able to come, as my daddy wound up having unexpected heart surgery the week before Alex's birthday. (He's recovering just fine, thankfully.)
This may be the only birthday I make a bunch of handmade stuff (of course, I say that, but who knows?), but again, I felt like I really needed to make this special. And yes, I fully acknowledge that this was for me mostly, as Alex won't remember a thing. However, he'll be able to look back at pictures someday and know that his mama cared enough to make sure his first birthday was a Big Deal.
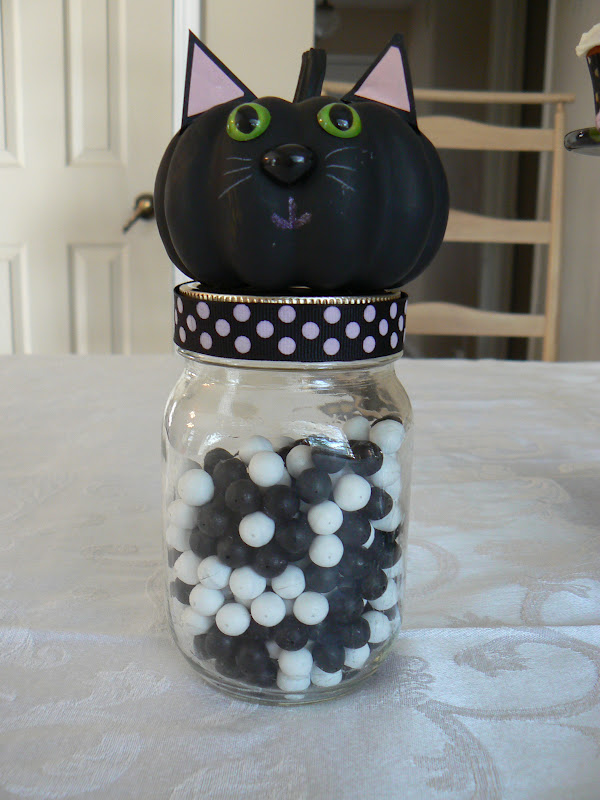
Alex adores our cats. (The feeling isn't mutual.) Since that's what he's most into, I decided to throw him a kitty party with a black-and-white color scheme in honor of Ninja's and Doogie's fur colors.
I used my DeNami Designs cat stamps make the invitations and cupcake toppers. The jars of black-and-white candy with pumpkins made into cats were inspired by the cover of an All You magazine that I saw. I made a special little cat shirt for the Birthday Boy to wear at his party.


It may have been a small party, but it was a good one. Happy First Birthday, my sweet boy!
Unfortunately, only the neighbors were able to come, as my daddy wound up having unexpected heart surgery the week before Alex's birthday. (He's recovering just fine, thankfully.)
This may be the only birthday I make a bunch of handmade stuff (of course, I say that, but who knows?), but again, I felt like I really needed to make this special. And yes, I fully acknowledge that this was for me mostly, as Alex won't remember a thing. However, he'll be able to look back at pictures someday and know that his mama cared enough to make sure his first birthday was a Big Deal.
Alex adores our cats. (The feeling isn't mutual.) Since that's what he's most into, I decided to throw him a kitty party with a black-and-white color scheme in honor of Ninja's and Doogie's fur colors.
I used my DeNami Designs cat stamps make the invitations and cupcake toppers. The jars of black-and-white candy with pumpkins made into cats were inspired by the cover of an All You magazine that I saw. I made a special little cat shirt for the Birthday Boy to wear at his party.
 |
| The Birthday Boy upon waking up |


 |
| Doogie cupcakes |
 |
| Ninja cupcakes |


It may have been a small party, but it was a good one. Happy First Birthday, my sweet boy!
Thursday, September 20, 2012


Thursday, September 6, 2012
Lately... (with a whole lot of rambling)
I feel as if I should have a label at the top of the page that reads, "This blog is nearly abandoned." Like a warning label or something. I blame Facebook. It's so much easier to post a pile of pictures there or use the camera on my iPod to quickly throw up a picture with a funny little one-liner, like the one I did of Ninja recently sitting in the high chair, complaining that the baby gets food when he sits there, while Ninja only gets his picture taken. Yeah...
Part of it is simply the act of Motherhood. I'm old and tired and have a very young and active small person to keep alive. I can't even blame the move anymore. The house is mostly put together, although there are still pictures hanging out in my hallway upstairs, rather than hanging on walls. And the baby is almost ready to be moved into a proper nursery. Truthfully, the baby is ready; it's the room that we're waiting on. Steven finally has it properly textured and painted, and he even replaced all the outlets and switches. Fresh and clean. We're just in the process of putting up some of the things on the walls. I expect poor Alex will finally get moved in over the weekend. I say poor Alex because the last time he had a proper nursery, he was 6 months old. He'll be a year old in 2 weeks.
Wow. We've lived here 5 months now. We finally got around to trading in our Texas driver's licenses for Oklahoma ones this week. While this really needed to be done for a lot of reasons, I'd been dragging my heels as long as possible. But with a presidential election coming up, and my preference for onebuffoon politician over another, I had to finally move on this in order to be able to vote. But it was a sad day, especially as I didn't even get to keep my Texas license. And it actually had my one and only good picture ever placed on a driver's license! (I still cringe when I think of the horrible profile picture on my license when I was 16. It was taken right before a drill team practice in the Texas summer heat, so I wasn't looking pretty. I got my license, drove all by myself to practice, then locked my keys in my car. My mom was not happy when she came and bailed me out of that pickle.)
Alex is teething again. Fun times. (Can you sense my sarcasm?) One tooth finally busted through, so I'm expecting 3 others to follow soon. I hope. Please, God, please. I have probably the most good-natured baby on the planet, but teething makes him something like the Hulk. "Don't make me get teeth. You won't like me when I'm teething." And with that, I just revealed my age, as I grew up watching Bill Bixby play the Hulk on TV. This just points back at my previous statement of being old and tired. (Seriously, God has a strange sense of humor to give a woman who can't get pregnant a baby when she's nearly 40. No wonder Sarah laughed when God said she'd have a baby! I have to wonder how tired she was as she ran around after little Isaac!)
Ninja is calming down. A lot. All the songs I've made up about him are no longer true, as they're about how naughty he is and how he steals food. Ever since we started supplementing the renal diet he eats along with Doogie, who is the reason they eat that way, with what we call "treat food" (it's Wellness wet food), he stopped trolling for food. More or less. He's still hopeful, but he doesn't lie in wait anymore for the moment you get up and leave your plate (stupidly) unattended. Now he hangs out under the high chair and hopes for something good. Alex likes to help him out. He's discovered that if he drops Cheerios, Ninja sometimes smacks them around the room. It's great entertainment for the two of them, but it means finding food in strange places for me.
Doogie is just Doogie. Sweet, quiet, sleeps a lot these days. I made a deal with him. He's okay with the baby living here, but he wants said baby to leave him alone. So, I promised that I would never make him be touched by Alex. We use Ninja for all cat-petting practice. I figure Doogie is old, sick, and he's been through hell and back in the past year-and-a-half with all the change we've brought into his life. He's earned the privilege of being left alone.
Speaking of the cats and the baby, we're having a kitty-themed birthday party for Alex. Everything will be black and white, in honor of Ninja and Doogie. Alex so adores his cats. Just wish the feeling was mutual.
And with that, I'll leave you with a random photo of my child enjoying bubbles (right before I mopped the floors, because there's no other way I'd ever blow soapy bubbles in my house):

Part of it is simply the act of Motherhood. I'm old and tired and have a very young and active small person to keep alive. I can't even blame the move anymore. The house is mostly put together, although there are still pictures hanging out in my hallway upstairs, rather than hanging on walls. And the baby is almost ready to be moved into a proper nursery. Truthfully, the baby is ready; it's the room that we're waiting on. Steven finally has it properly textured and painted, and he even replaced all the outlets and switches. Fresh and clean. We're just in the process of putting up some of the things on the walls. I expect poor Alex will finally get moved in over the weekend. I say poor Alex because the last time he had a proper nursery, he was 6 months old. He'll be a year old in 2 weeks.
Wow. We've lived here 5 months now. We finally got around to trading in our Texas driver's licenses for Oklahoma ones this week. While this really needed to be done for a lot of reasons, I'd been dragging my heels as long as possible. But with a presidential election coming up, and my preference for one
Alex is teething again. Fun times. (Can you sense my sarcasm?) One tooth finally busted through, so I'm expecting 3 others to follow soon. I hope. Please, God, please. I have probably the most good-natured baby on the planet, but teething makes him something like the Hulk. "Don't make me get teeth. You won't like me when I'm teething." And with that, I just revealed my age, as I grew up watching Bill Bixby play the Hulk on TV. This just points back at my previous statement of being old and tired. (Seriously, God has a strange sense of humor to give a woman who can't get pregnant a baby when she's nearly 40. No wonder Sarah laughed when God said she'd have a baby! I have to wonder how tired she was as she ran around after little Isaac!)
Ninja is calming down. A lot. All the songs I've made up about him are no longer true, as they're about how naughty he is and how he steals food. Ever since we started supplementing the renal diet he eats along with Doogie, who is the reason they eat that way, with what we call "treat food" (it's Wellness wet food), he stopped trolling for food. More or less. He's still hopeful, but he doesn't lie in wait anymore for the moment you get up and leave your plate (stupidly) unattended. Now he hangs out under the high chair and hopes for something good. Alex likes to help him out. He's discovered that if he drops Cheerios, Ninja sometimes smacks them around the room. It's great entertainment for the two of them, but it means finding food in strange places for me.
Doogie is just Doogie. Sweet, quiet, sleeps a lot these days. I made a deal with him. He's okay with the baby living here, but he wants said baby to leave him alone. So, I promised that I would never make him be touched by Alex. We use Ninja for all cat-petting practice. I figure Doogie is old, sick, and he's been through hell and back in the past year-and-a-half with all the change we've brought into his life. He's earned the privilege of being left alone.
Speaking of the cats and the baby, we're having a kitty-themed birthday party for Alex. Everything will be black and white, in honor of Ninja and Doogie. Alex so adores his cats. Just wish the feeling was mutual.
And with that, I'll leave you with a random photo of my child enjoying bubbles (right before I mopped the floors, because there's no other way I'd ever blow soapy bubbles in my house):

Friday, August 17, 2012
Scouting Out the Thrift Stores
I started thrift shopping as an occasional hobby years ago. I had my favorite stores in Texas. I've had to look for new places here in Oklahoma. I've visited the Goodwill in town on the recommendation of my neighbor from housing at The Voice of the Martyrs. She said they have a great clothing selection. She wasn't wrong. However, in all honesty, I don't have the patience to look for clothing. The Goodwill here seems to be mostly clothing, and maybe if I had time to myself (meaning, without a baby in tow), I'd enjoy looking for some gems for myself. But with an active baby who doesn't like sitting still in an unmoving stroller while his mama stands and stares at clothing racks, it's a no-go for now.
There's a store here that's open only on Tuesdays, so I checked it out a couple of months ago. The room I started in didn't look promising, as it was mostly broken furniture and old junk that I couldn't see anyone having a use for. It's going to take a lot of imagination for someone to come up with a reason to take a lot of that stuff home. But I kept going and found a room with housewares, fabric, greeting cards, collectibles, and various other bits and bobs. I found myself repeatedly going back to look at a pair of sconces. Finally, I figured that $7 was a small price to pay for something new for my dining room walls, and if I wound up not liking them when I got home, no big loss.
Turns out, I love them, and so does my husband.

Also, in that store, I found these notecards:

There's a reason I bought notecards from Norway. Years ago, I lived in Stavanger, Norway. In fact, the only reason I'd even heard of Bartlesville, OK was because I'd gone to school in Norway with a bunch of kids who were from Bartlesville. (It's a big oil town, and oil is the reason we were all in Norway.) At 25 cents for 4 notecards, I considered it a steal.
I found another store because it had a coupon in one of those around-the-town-type magazines that show up in the mail. When I went in for a look-see, I found the cutest little rocker for $25. I didn't buy it then, but I took a few days to think about it. When I was still really wanting it, I went back for it. Seeing as my coupon was for $5-off $25 or more, I got the chair for $20.

It definitely needs some TLC. If Howards's Restore-a-Finish doesn't do the trick, I'll paint the wood. I have fabric to recover the seat. Initially, I bought the chair for Alex's room, but once I got it home, I realized it would make a perfect little chair to put by a bookcase for a reading area. It's fun to have a living room now that's big enough to need a bit more furniture and to have various zones. I have big plans for my home, but it'll take a few years for everything to come to fruition. It's a work in progress.
Wednesday, July 25, 2012
Homeless
We have a beautiful new house in Oklahoma. We're settling in and making our house a happy home. And yet, in some ways we're still homeless.
I'm talking about church.
After being members of the same church for over a decade, it's been hard to pick up and try to find a new church home. Nothing has been just right. We want a mix of people passionate for God, active community service and missions emphasis, good music, solid teaching, and friendly, welcoming arms.
If churches are living out their faith actively, that shouldn't be a tall order. And yet, we're finding that it is.
One church would have been perfect for us. It pretty much fit the bill, except we couldn't come to terms with their style of worship. The word style isn't quite right here, but I'm not sure what else to use. We're lifelong Baptists, and this was a pentecostal church. Long story how we ended up there, but it's really a great church. We just couldn't get comfortable with people speaking in tongues (without an interpreter, as the bible says there should be) and practically having seizures in the front of the church, then falling over backwards. I'm sure those folks are quite sincere in their faith, but I just don't understand it.
Another church had a fantastic Sunday school and friendly people, but the church service was dead. Absolutely dead. Even their kids' VBS presentation lacked any energy. I had the impression that the Spirit wasn't there, and this church would not be a partner to us in cultivating a love for the Lord in our son.
Yet another church had a friendly, family feel to it. We liked that. The pastor obviously shepherds his congregation and has a true heart for the Lord. But the Sunday school class that best fit our needs was just awful. The teacher doesn't have the gift of teaching, unfortunately, and the whole class was checked out. The music was dreadful. I was passionately involved in the music ministry in our church in Texas, and I just couldn't see getting involved in this one. I tried to overlook it, but I just can't.
While I think we've found our church, we're still not certain. Music is amazing, teaching is not just good, but intellectual (that's becoming more and more unusual these days), the nursery is great for Alex, they're actively involved in the community and missions, but... the only people who talk to us when we go there are Steven's coworkers and our neighbors. They have no Sunday morning classes to get to know people, so we'll have to join a small group before we really get a feel for whether or not this is the place for us. Except, small groups shut down for the summer. *sigh* I know that churches have trouble keeping stuff staffed when folks are on vacation, and leaders need a break once in a while, but I do wish churches would see what a bind this puts visitors in.
I've been sick, so I stayed home with Alex on Sunday morning. When Steven got home, I asked about church. He said the service was good. But when I asked if anyone talked to him, he said that only folks he spoke to first talked to him. Ouch. There's something very wrong with that picture.
More and more, I'm realizing that the verses in the bible about hospitality aren't simply referring to offering food or a place to stay or otherwise opening one's home. Church is also home, so Christians should be welcoming strangers into that house, too. If you see visitors at your church on Sunday, please talk to them. Make them feel welcomed. Chances are, your church isn't the first they've visited, and they're growing weary of the search. I know that most folks are probably not meaning to be unwelcoming; they're absorbed in their own lives and just not thinking. I've been guilty of that myself in my own church back home. But being on the other side has really opened my eyes. I can't help but wonder how many folks have entered a church seeking God and have turned away simply because they weren't made to feel welcomed.
Keep on loving one another as brothers and sisters. Do not forget to show hospitality to strangers, for by so doing some people have show hospitality to angels without knowing it. (Hebrews 13:1-2)
Subscribe to:
Posts (Atom)